AnterVue for Blepharitis: Fast Lid-Margin Imaging That Turns What You See Into What Patients Understand
Blepharitis visits are busy. You already know what to look for at the lash line—debris, margin erythema, surface injection—but turning that into a repeatable image often waits until someone has time at a larger imaging station, or it never gets captured at all.
AnterVue is built for a different pace: fast lid-margin photography on the hardware you already carry—a smartphone or tablet—so ocular surface teams can document the lash line in pre-test or at the chair, then use the image immediately in the conversation.
It supports clinician-directed care. It does not replace your examination or clinical judgment. It can make visible findings easier to show, store, and revisit.
A Representative Blepharitis Capture (What Patients See)
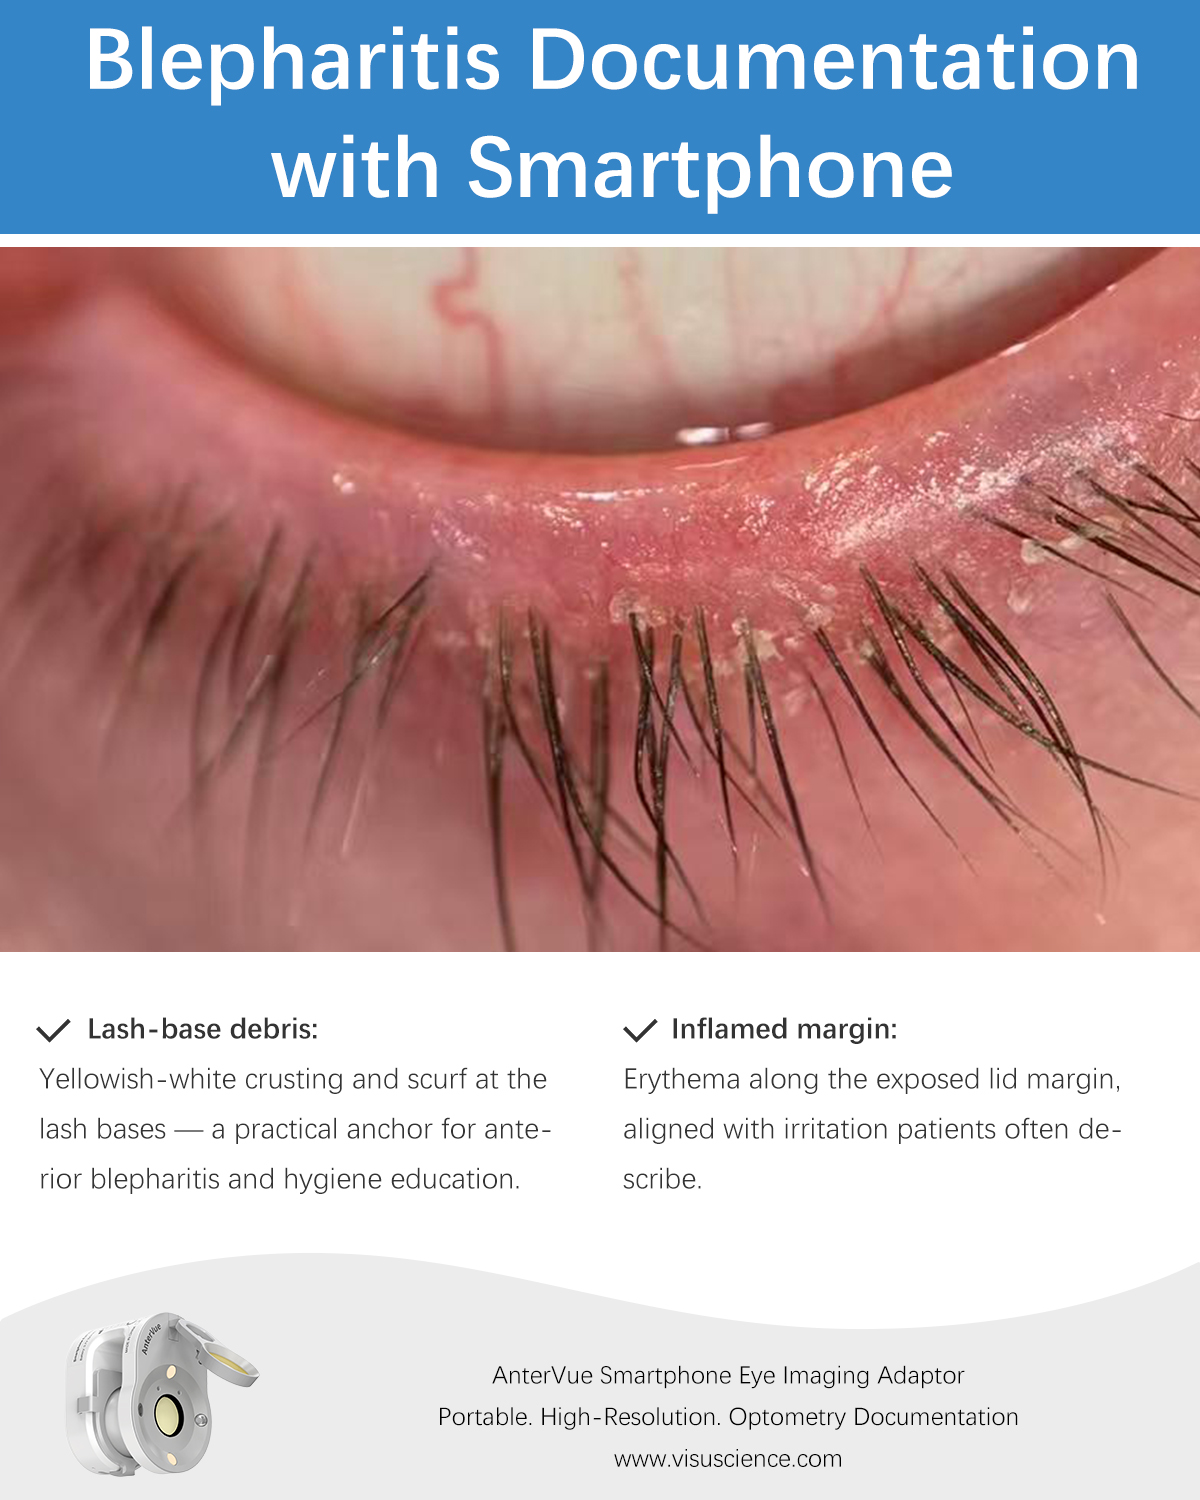
This week’s de-identified lower-lid case illustrates why teams use AnterVue at the margin—not only for records, but for the conversation:
✓Lash-base debris: Yellowish-white crusting and scurf at the lash bases—an immediate anchor for anterior blepharitis and daily lid hygiene.
✓Inflamed margin: Erythema along the exposed lid margin, matching irritation many patients report.
✓Ocular surface context: Conjunctival injection on the exposed sclera with sharp focus at the lash base for chairside review or follow-up comparison.
That is the clinical value in one capture: fast, visible, specific to the lash line—not a generic “dry eye” slide.
How Teams Use AnterVue in Blepharitis Flow
Pre-test (most common): Technician retracts the lid, captures with AnterVue, saves to the patient discussion or EHR workflow per clinic practice. Doctor enters with images ready.
Chairside: Same-day capture when you need the patient to see margin changes during the plan discussion.
Follow-up: Re-capture at the lash line to compare debris, erythema, and surface findings visit to visit.
Outreach and screening: Portable setup supports ocular surface events where a fixed photography suite is not practical.
Imaging supports documentation and education; it does not diagnose blepharitis subtype or guarantee treatment response. Your assessment and plan remain central.
Quick Capture Checklist (AnterVue at the Lash Line)
- Attach AnterVue to the smartphone or tablet per kit instructions.
- Gently retract the lower lid to expose margin, lashes, and inner surface.
- Center the lash base; stabilize for a sharp frame.
- Capture; review on screen with the patient when education is the goal.
- Store and label per clinic policy for identifiable records; keep de-identified teaching files separate.
Consistent technique helps serial comparison; adjust to your device, lighting, and approved product instructions.
Request a demo or ask about your clinic setup:info@visuscience.com · www.visuscience.com
Blepharitis visits are busy. You already know what to look for at the lash line—debris, margin erythema, surface injection—but turning that into a repeatable image often waits until someone has time at a larger imaging station, or it never gets captured at all.
AnterVue is built for a different pace: fast lid-margin photography on the hardware you already carry—a smartphone or tablet—so ocular surface teams can document the lash line in pre-test or at the chair, then use the image immediately in the conversation.
It supports clinician-directed care. It does not replace your examination or clinical judgment. It can make visible findings easier to show, store, and revisit.
A Representative Blepharitis Capture (What Patients See)
This week’s de-identified lower-lid case illustrates why teams use AnterVue at the margin—not only for records, but for the conversation:
✓Lash-base debris: Yellowish-white crusting and scurf at the lash bases—an immediate anchor for anterior blepharitis and daily lid hygiene.
✓Inflamed margin: Erythema along the exposed lid margin, matching irritation many patients report.
✓Ocular surface context: Conjunctival injection on the exposed sclera with sharp focus at the lash base for chairside review or follow-up comparison.
That is the clinical value in one capture: fast, visible, specific to the lash line—not a generic “dry eye” slide.
How Teams Use AnterVue in Blepharitis Flow
Pre-test (most common): Technician retracts the lid, captures with AnterVue, saves to the patient discussion or EHR workflow per clinic practice. Doctor enters with images ready.
Chairside: Same-day capture when you need the patient to see margin changes during the plan discussion.
Follow-up: Re-capture at the lash line to compare debris, erythema, and surface findings visit to visit.
Outreach and screening: Portable setup supports ocular surface events where a fixed photography suite is not practical.
Imaging supports documentation and education; it does not diagnose blepharitis subtype or guarantee treatment response. Your assessment and plan remain central.
Quick Capture Checklist (AnterVue at the Lash Line)
- Attach AnterVue to the smartphone or tablet per kit instructions.
- Gently retract the lower lid to expose margin, lashes, and inner surface.
- Center the lash base; stabilize for a sharp frame.
- Capture; review on screen with the patient when education is the goal.
- Store and label per clinic policy for identifiable records; keep de-identified teaching files separate.
Consistent technique helps serial comparison; adjust to your device, lighting, and approved product instructions.
Request a demo or ask about your clinic setup:info@visuscience.com · www.visuscience.com